Under the Hood: A Power User's Tour of eclipseClick's Advanced Settings
The defaults are Espenak-derived and safe to trust blind. But your 8-inch Schmidt-Cassegrain, your 7°-altitude totality, and your camera's actual burst rate aren't problems the defaults can solve for you — they're yours to adapt. Here's every advanced control eclipseClick gives you, and the reasoning behind each one.
Most people who use eclipseClick never need to open a single advanced panel. Pick your eclipse, pick your camera, run the wizard, and the app hands you an exposure sequence built straight from Fred Espenak's Table 23 — the same reference the eclipse-photography community has trusted for decades. That's intentional. The defaults exist so you don't have to think about Q-factors at 2 a.m. the night before an eclipse.
But eclipseClick isn't only a defaults engine. Underneath the wizard's clean surface is a set of controls for people whose setup doesn't match the assumed case — a telescope instead of a lens, a site where totality happens 7° above a hazy horizon, a camera body with its own bracket quirks. This post is the tour of those controls: what each one is for, why it exists, and when you should actually reach for it.
Optics & Sensor Configuration
Every exposure eclipseClick computes — for every phenomenon, at every phase of the eclipse — comes from one formula, straight out of the NASA/Espenak eclipse photography guide:
t = f² / (ISO × 2Q)
Shutter time, from f-number, ISO, and a phenomenon-specific Q value
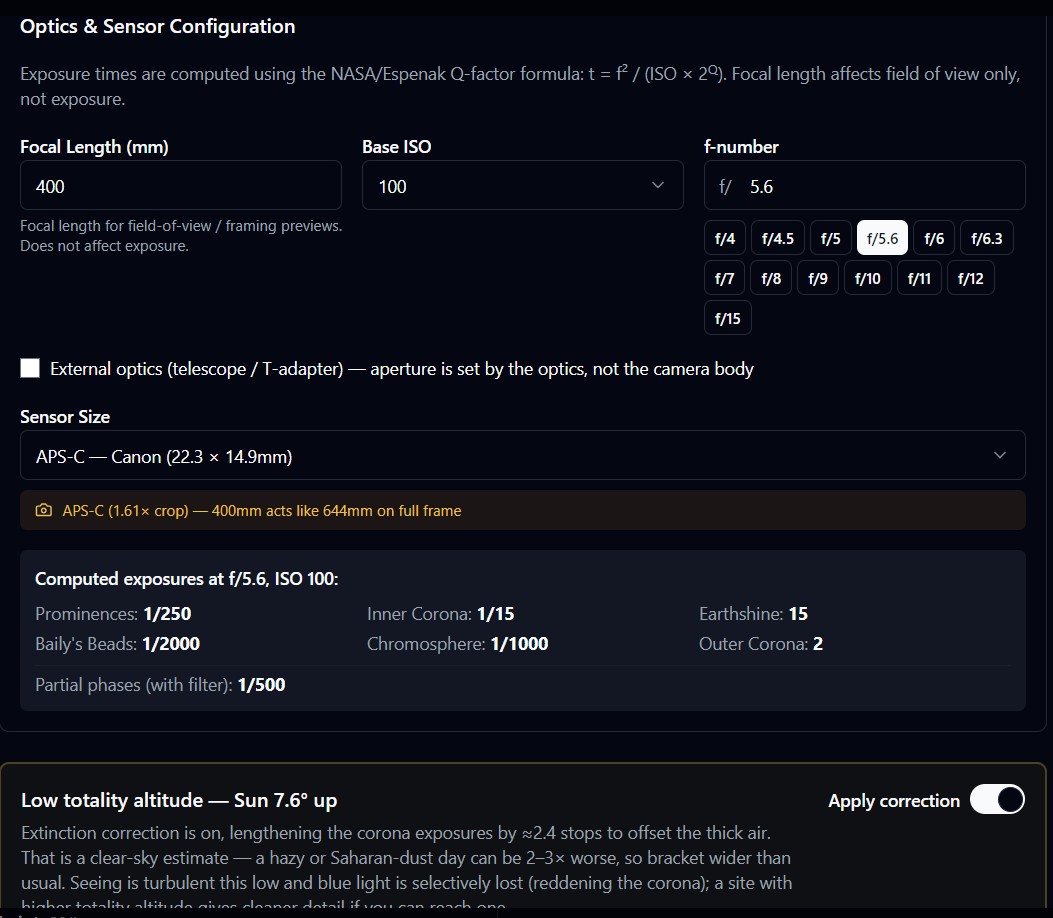
The detail that trips people up the first time: focal length isn't in that formula anywhere. The f-number already encodes the ratio between focal length and aperture diameter, so it's the only lens property exposure math needs. In the Camera Setup step, focal length exists purely to drive the field-of-view and framing previews — how big the Sun looks in your frame, whether the corona will fit. Change it and your preview changes; your computed shutter speeds don't move at all.
The f-number itself has quick-pick chips from f/4 to f/15 alongside base ISO selection, and sensor size is auto-detected for recognized camera bodies. When your sensor is smaller than full frame, a crop banner spells out exactly what that means for your framing — e.g. "APS-C (1.61× crop) — 400mm acts like 644mm on full frame" — so you're not doing the crop-factor math in your head under pressure.
Below that sits a live Computed exposures panel: shutter speeds for every phenomenon — Prominences, Baily's Beads, Inner Corona, Chromosphere, Earthshine, Outer Corona, and filtered partial phases — updating in real time as you change f-number or ISO. I'd treat this panel as a sanity check against your mount, not just a readout. Earthshine routinely lands at multi-second exposures; if you're on a static tripod rather than a tracked mount, that's the number that tells you star-trail-style blur is coming before you're standing in the field discovering it.
The External Optics Checkbox
If you're shooting through a telescope or a T-adapter rather than a camera lens, there's a single checkbox that matters more than almost anything else on this screen: External optics (telescope / T-adapter).
Normally eclipseClick sends aperture commands to your camera body over the SDK — it's setting the f-stop on your behalf as part of each capture. But a camera body bolted to a telescope has no aperture of its own to control; the telescope's optical design fixes it. Checking this box tells eclipseClick to stop sending those aperture commands entirely, while still using the f-number you've entered purely for exposure math. In other words: the number in the f-number field stops being an instruction to the camera and becomes pure input to the Q-factor formula.
Set it to your telescope's actual focal ratio.
If your scope is f/7, enter f/7 — not the nearest quick-pick chip, not your camera's native lens speed. Every downstream exposure calculation depends on this number being right, and nothing in the app can double-check it against the optics for you.
Atmospheric Extinction Correction
This control only surfaces when it's relevant: when totality happens at low solar altitude. Sunlight — and the light from the corona during totality — travels through dramatically more atmosphere near the horizon than overhead, and that extra air soaks up real light. Espenak's Q-factor table assumes the Sun is reasonably high; at low altitude, using it unmodified quietly underexposes the corona.
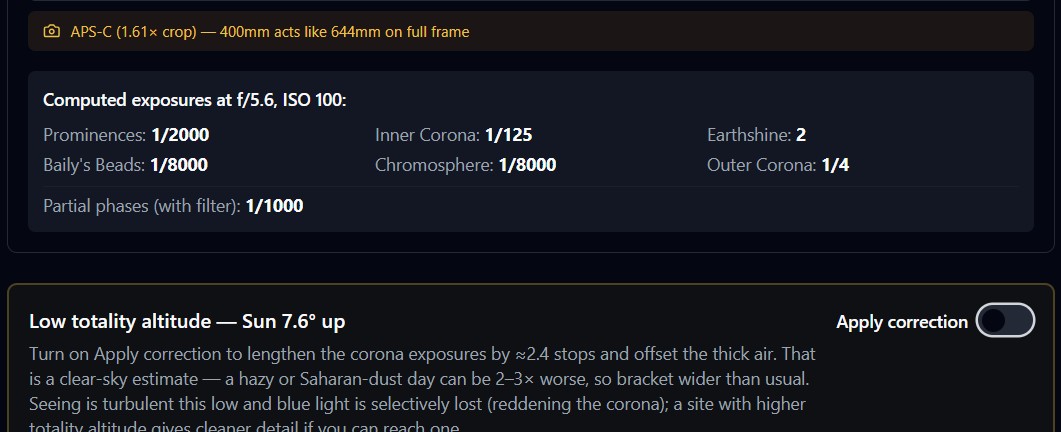
Here's a real example from a low-altitude site — Sun 7.6° up at totality. With the Apply correction toggle off, the computed panel shows Prominences at 1/2000. Flip the toggle on, and the same frame lengthens by roughly 2.4 stops, to 1/250. That's the air near the horizon stealing that much light from the corona before it ever reaches your sensor — the correction just opens the shutter back up to compensate.
Two caveats worth internalizing before you rely on this at all:
- It's a clear-sky estimate. The correction models a standard atmosphere, not your actual sky. Haze or Saharan dust can make real losses 2–3× worse than the model predicts — which is exactly the situation where you want to bracket wider than the correction alone suggests, not narrower.
- Low altitude brings problems this toggle doesn't fix. Turbulent seeing near the horizon will soften fine detail no exposure setting can rescue, and selective loss of blue light reddens the corona's color relative to how it looks higher in the sky. If you have any choice of site for a low-altitude eclipse, higher totality altitude buys you cleaner detail on top of the light this correction recovers.
The Per-Phenomenon Advanced Panel
Expand any phenomenon row in Capture Preferences and you get a full control surface underneath it — the deepest layer of customization in the app, and the one most people never open because the defaults are simply good.
Overrides, Type, and Preset
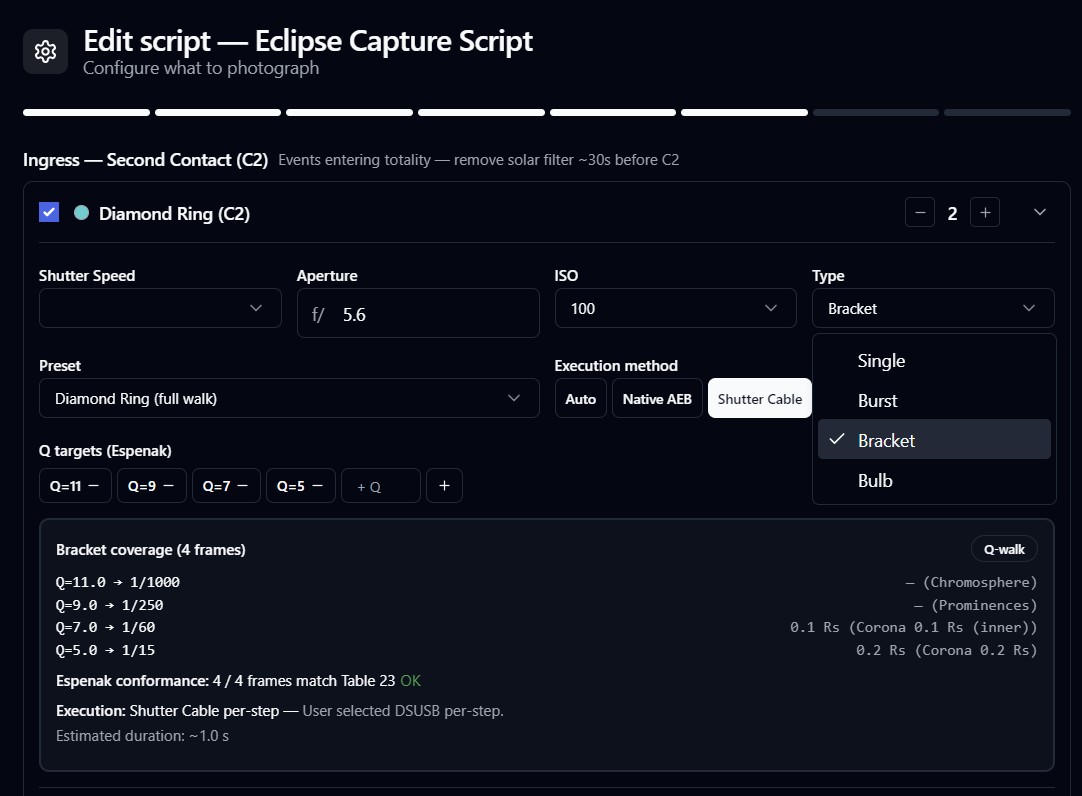
Shutter, aperture, and ISO can each be overridden per phenomenon — leave any of them blank and it falls back to the computed default. The Type selector picks the capture behavior: Single for one frame at fixed settings, Burst for a rapid continuous sequence (this is what you want for Baily's Beads, where the exact instant of the flash isn't perfectly predictable), Bracket for a multi-frame exposure sweep (the standard approach for corona, which spans an enormous dynamic range), and Bulb for a long exposure held open by a shutter cable — the only way to capture Earthshine's multi-second exposures without your camera's own shutter-speed ceiling getting in the way.
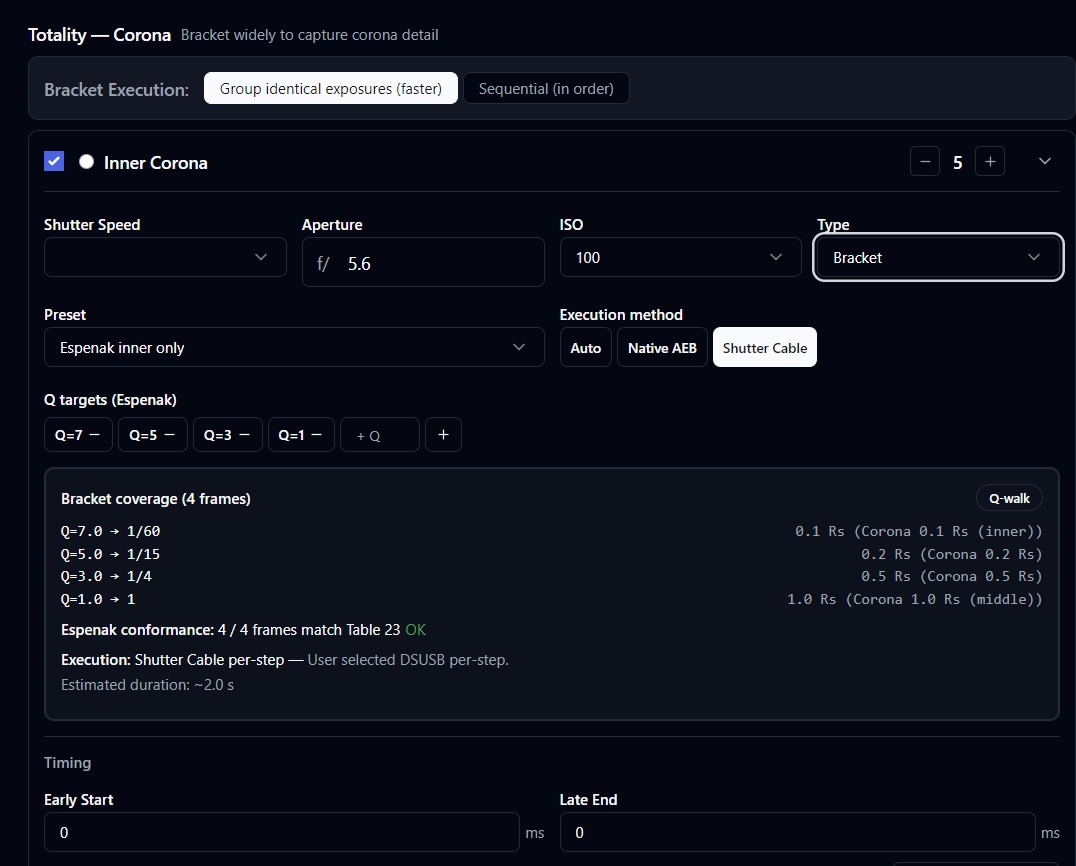
Preset loads one of the built-in Espenak Q-walk sequences, sourced directly from NASA Table 23: "Diamond Ring (full walk)," "Espenak corona (full)" (a 9-frame walk from Q 11 down to Q −3, spanning chromosphere out to 8 solar radii of streamers), "Espenak corona (compact)" (Q 7, 5, 3, 1, −1), "Espenak inner only" (Q 7, 5, 3, 1), and "Espenak outer only" (Q 1, 0, −1, −3). These aren't arbitrary groupings — they're the exact frame sets eclipse photographers have used for years to build HDR corona composites, just pre-loaded so you don't have to type Q values from a printed table by hand.
Execution Method: Auto, Native AEB, Shutter Cable
A bracket preset describes what to shoot; execution method decides how the camera actually fires it. Auto is the setting I'd leave alone unless you have a specific reason not to: it checks whether your connected body can faithfully reproduce the preset's frame count and EV spacing using its own native auto-exposure bracketing, and uses that when it can. When it can't — because your body's built-in AEB tops out at 3 or 5 frames, or its EV-step options don't match the preset — it falls back to firing each frame individually over a shutter cable instead, one step at a time. The coverage panel underneath always shows you which path actually got resolved, so you're never guessing what your camera is about to do.
Q Targets and Bracket Coverage
Each preset expands into a row of Q-target chips — one chip per frame. Remove a frame with the − button, or add a custom Q value with "+ Q" if you want a frame the built-in presets don't include. Below the chips, a read-only bracket coverage panel expands every single frame: its resolved shutter speed ("Q=7.0 → 1/60"), the solar-radius feature it corresponds to ("0.1 Rs (Corona 0.1 Rs (inner))"), an Espenak conformance readout ("4 / 4 frames match Table 23 OK" — meaning every frame lands within 0.25 EV of an actual Table 23 row), the resolved execution path, and an estimated total duration for the burst.
Early Start and Late End
Every phenomenon's capture window is anchored to a reference contact — C1, C2, maximum, C3, or C4. Early Start and Late End (0–60,000 ms, in 100 ms steps, defaulting to zero) let you pad that window earlier or later than the contact time strictly calls for.
The reason this exists: your contact times are only as good as the inputs behind them — site coordinates, lunar limb effects at your specific location, and your camera's own clock drift all introduce some uncertainty. A diamond ring sequence that starts exactly at C2 and nowhere earlier is betting your entire capture on that timing being perfect. Padding the window is cheap insurance against a fleeting event like the diamond ring simply not showing up in frame because reality was a second or two off from the model.
Padding doesn't add captures — it spreads them.
Stretching the window with Early Start or Late End spreads the same frame count over a longer span, so your capture density (frames per second) actually drops. If density matters for a fast-moving event, raise the frame count alongside the padding, not instead of it. Padding is also clamped to physical eclipse boundaries — the first partial phase can never reach earlier than C2 minus 2 minutes, and the second partial phase can never cross past C4 — so you can't accidentally pad a window into physically impossible territory.
My practical guidance: 2–3 seconds of padding on each side of C2/C3-anchored phenomena is cheap insurance that costs you almost nothing in density. It's the kind of setting you set once, during a calm planning session, specifically so you don't have to think about it during the 30 seconds of totality you actually get.
The Sequence View, and Editing It Directly
Once a script is generated, the Script page's Sequence panel shows every timed exposure line the wizard produced — line number, reference event, offset, shutter speed, aperture, ISO, and image format, all in one scannable table. Click any row and it expands in place into a full editor for that single line: shutter speed and aperture as dropdowns, ISO pulled from your connected camera's actual supported values when one is attached, reference event, offset, capture type, and image format all directly editable, with Save, Delete, and Cancel right there.
So yes — you can hand-edit individual script lines. I'd treat that as a "yes, but" rather than a "yes, and": a hand-edited line can drift away from the Espenak-recommended exposure the wizard originally computed for that frame, and once you're editing lines one at a time it's easy to lose track of how the whole sequence hangs together.
That's what the Espenak Audit banner above the sequence table is for. It checks every corona line against Table 23 continuously, not just at generation time. When every frame is on-table, it collapses to a small green "Espenak conformance OK" pill. The moment a line drifts, it becomes an informational banner — deliberately never an alarm, since a deliberate exposure choice is legitimate — showing exactly which lines and frames differ, by how many EV, and how far off Table 23's nearest row they've landed. From there, a one-click "Auto-align to Espenak preset" button (where available) resets flagged phenomena straight back to their preset defaults.
In practice: edit lines directly when you know exactly what you're changing and why. Otherwise, make changes through the wizard's per-phenomenon panel described above, where overrides, presets, and coverage all stay in sync automatically. Either way, the audit banner has your back — it's watching the sequence, not just the moment you generated it.
None of this is meant to replace the defaults — it's meant to widen what "the defaults" can mean for your specific gear and site. Espenak's Table 23 is the foundation underneath every one of these controls; the advanced settings just give you the levers to keep that foundation solid when your setup isn't the average case it was built around.
Clear skies,
Swaroop Shere
Ready to adapt eclipseClick to your own setup?
Espenak-derived defaults out of the box, with a full set of advanced controls underneath for telescopes, low-altitude sites, and hand-tuned bracket sequences.