Post-Install Setup Guide
Once eclipseClick is installed and your camera is detected, this guide covers GPS, script generation, focusing, practice, and eclipse day. New here? Start with the Installation Guide first.
Before you start
This guide picks up after eclipseClick is installed and your camera shows up under the Equipment tab. Steps before that point — downloading the installer, vendor SDKs, USB drivers, the WinUSB swap for unsupported Sony bodies — are in the Installation Guide.
Confirm Equipment shows your camera as Connected before continuing. If it doesn't, head back to the Installation Guide for your specific OS + camera combination.
GPS Receiver Pro
A GPS receiver gives eclipseClick precise time synchronization and location data for sub-second contact time accuracy.
Connect your GPS receiver
Plug a serial or USB GPS receiver into your computer. Most USB GPS receivers use a serial-to-USB adapter and appear as a COM port in Windows.
Detect in eclipseClick
Go to the Equipment tab. eclipseClick will auto-detect your GPS receiver. If it doesn't appear, you can manually select the COM port from the dropdown.
Wait for GPS fix
Place your GPS receiver near a window or outdoors. The status indicator turns green when the receiver has a satellite fix. This can take 30 seconds to a few minutes.
Pro Feature
Script Wizard
The Script Wizard walks you through building a capture plan in 8 steps. Each step is straightforward — just follow the prompts.
Welcome
Overview of the script creation process.
Eclipse
Select your target eclipse from the catalog (2024–2100).
Location
Choose your observation location on the interactive map.
Camera
Configure your camera's focal length, sensor size, and base ISO.
Connection
Choose how eclipseClick connects to your camera (SDK or DSUSB).
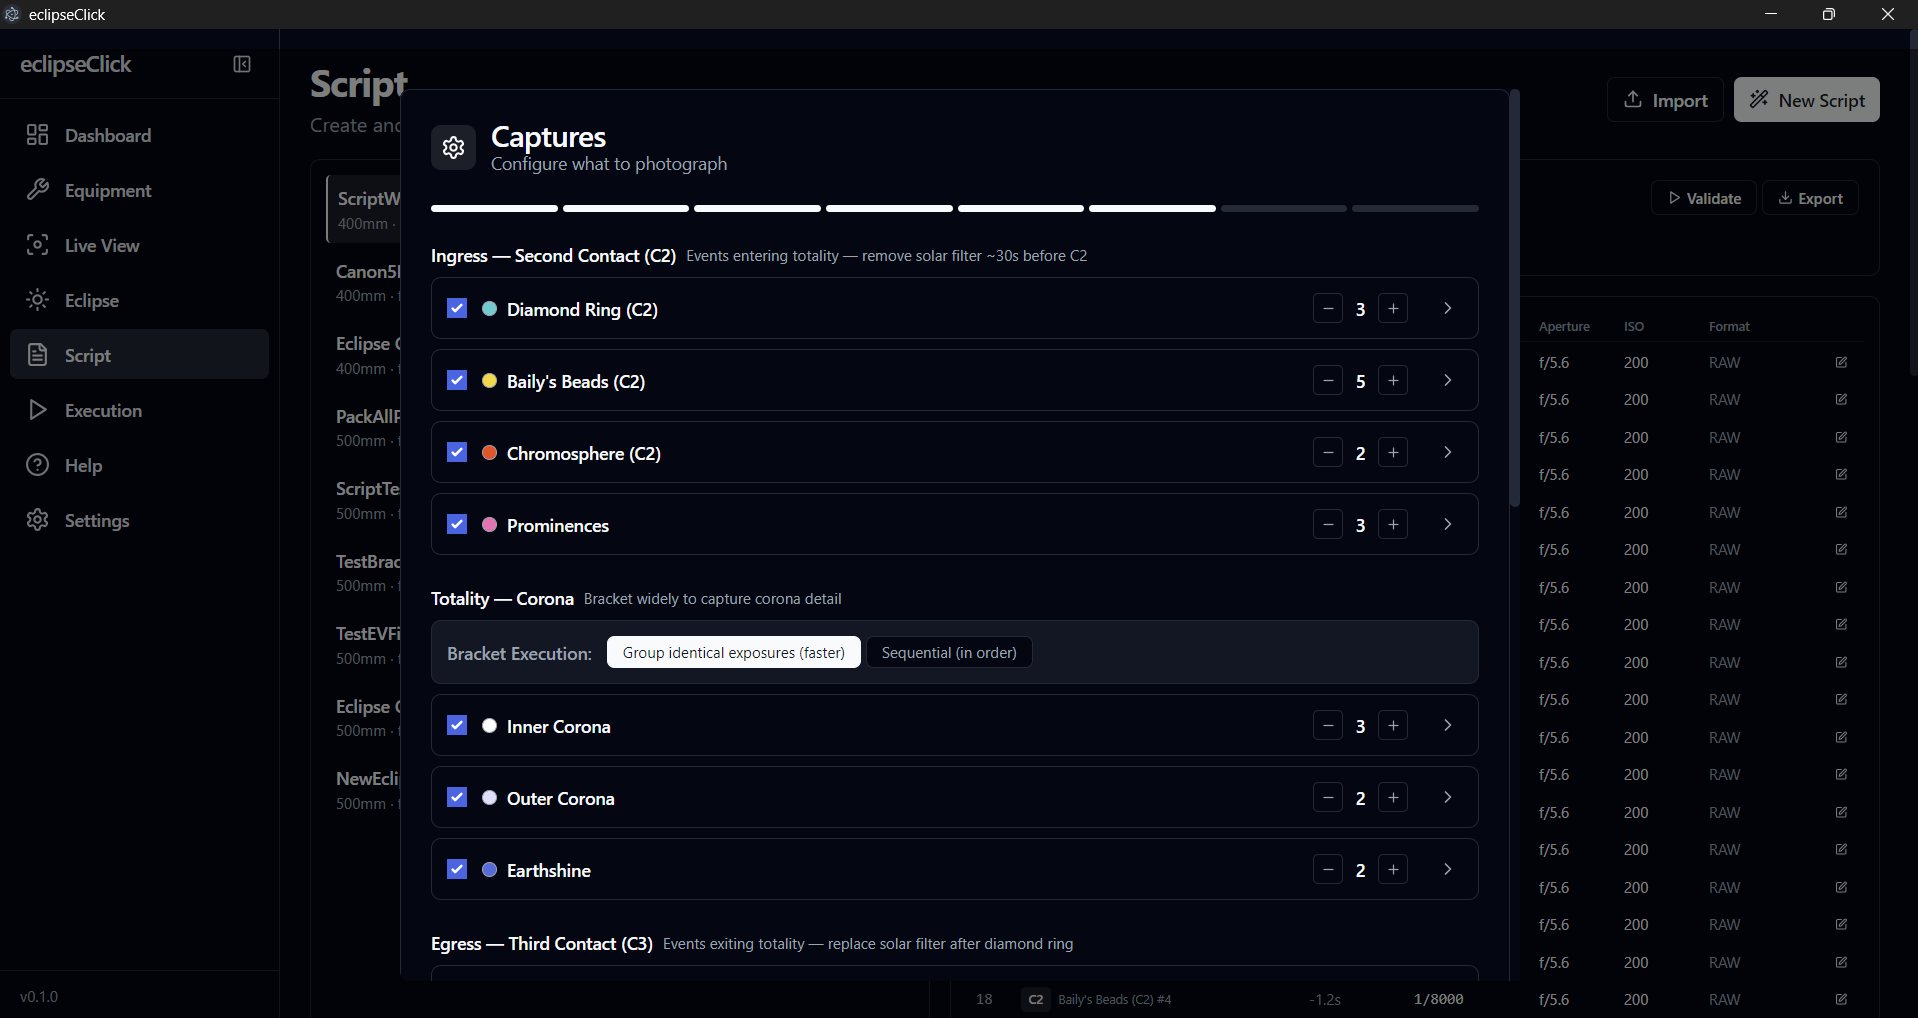
Captures
Define what to photograph — contact moments, diamond ring, corona, and more.
Timeline
Review your entire capture plan on a visual timeline.
Complete
Validate and save your script. Ready for eclipse day.
Tip
Focusing & Live View
Sharp focus is the single most important factor in eclipse photography. A slightly out-of-focus image cannot be fixed in post-processing. eclipseClick's Live View lets you nail focus before the eclipse starts — but you need to understand how focus behaves in the field.
Enable Live View
Go to the Equipment tab and click Live View on your connected camera. eclipseClick streams the camera's sensor output to your screen in real time. Use this to frame the sun and evaluate focus.
Focus on the sun with your solar filter
With your solar filter attached, point at the sun and use your lens's focus ring to get a sharp solar disk. Look for a clean, crisp edge on the sun's limb. If your lens has autofocus, you can use it to get close, then switch to manual focus and fine-tune.
Use magnified Live View for precision
Zoom in on Live View (most cameras support 5x and 10x magnification) to check focus at the pixel level. A sunspot or the limb edge makes a good focus target. At high magnification, even small focus errors are obvious.
Lock focus to manual
Once you're satisfied with focus, switch your lens to MF (manual focus). This prevents the camera from re-focusing during the capture sequence. If your lens has a focus lock switch, engage it. Some photographers tape the focus ring in place as extra insurance.
Focus Drift
Focus is not a set-and-forget operation. Your focus point will shift throughout the day due to environmental factors. Understanding this is critical for sharp eclipse images.
Temperature changes
As the day warms up, your lens barrel and optical elements expand. Metal and glass expand at different rates, shifting the focal point. A lens focused perfectly at 9 AM may be noticeably soft by 1 PM. Refractors and long telephoto lenses are especially sensitive — even a few degrees can cause visible defocus at focal lengths above 300mm.
Temperature drop during totality
During totality, the air temperature can drop 5-15°F (3-8°C) in minutes as the sun is blocked. This rapid cooling shifts focus in the opposite direction from the gradual daytime warming. If you focused during the hot afternoon partial phase, your totality images may be soft. Plan to re-check focus shortly before C2 (second contact).
Time of day
The sun's altitude affects atmospheric refraction and heat shimmer. Focus set early in the morning when the sun is low may not hold as the sun climbs higher and the air column you're shooting through changes. Ideally, set your final focus within 30-60 minutes of totality.
Mechanical settling
After transporting your equipment, lenses and telescope focusers need time to settle mechanically and thermally. Set up at least 1-2 hours before totality so your optics can reach thermal equilibrium with the ambient environment.
Focus strategy for eclipse day
Do an initial focus when you set up, then re-check focus every 30 minutes during the partial phase. Do your final focus check 15-30 minutes before totality. After locking focus, avoid touching the lens or tripod.
If you're using a refractor telescope, consider a motorized focuser so you can make micro-adjustments without physically touching the scope (which introduces vibration).
Do not remove your solar filter to check focus
Practice & Preparation
A total solar eclipse lasts only a few minutes. There are no second chances and no do-overs. The weeks and months before the eclipse are when you earn sharp images — by practicing until every step is muscle memory. If something can go wrong on eclipse day, it will. The only defense is having seen it before.
Practice Runs
Start practicing at least 2-3 months before the eclipse. Run full end-to-end capture sessions — not just totality, but the entire sequence from C1 through C4.
Run full-length simulations
Create your script in the Script Wizard and execute it in Simulation mode. This runs the full capture sequence at real-time speed — every exposure fires at the correct moment relative to contacts. A typical eclipse script runs 2-3 hours from C1 to C4. Run the whole thing. You need to know how it feels to sit through the entire partial phase and trust the automation.
Practice with real hardware connected
Simulation mode is great for timing, but you need to practice with your actual camera connected. Point your camera at the sun (with a solar filter!) and run your script. Verify that every settings change (ISO, shutter speed, aperture) actually happens on the camera. Check that images are being saved to the right location and that your memory card has enough space for the entire session.
Practice the physical setup
Time yourself setting up from a cold start: unpacking, mounting the camera on the tripod, connecting USB cables, launching eclipseClick, connecting the camera, achieving focus, and starting the script. Do this until you can reliably set up in under 20 minutes. On eclipse day, you want setup to be automatic so you can focus on conditions, not logistics.
Practice solar filter removal
You must remove your solar filter at second contact (C2) and replace it at third contact (C3). Practice this motion until it's smooth and fast — you don't want to bump the camera or shift the framing. Some photographers use a flip-style filter holder for instant removal.
Rehearse the full partial-to-totality transition
The 60 seconds before C2 are the most intense. Your script handles the camera, but you need to manage the solar filter, watch the eclipse, and stay calm. Practice this transition repeatedly so that when the diamond ring appears, you're not scrambling.
Practice on the moon
Failure Testing
Don't just practice the happy path. Deliberately break things during practice runs so you know what happens and how to recover. Every failure you encounter in practice is one you won't panic about on eclipse day.
Camera battery dies mid-capture
Run your script until the battery dies. How long does your battery last during continuous SDK-controlled shooting? A typical DSLR battery lasts 1.5-3 hours under USB control with Live View. Know your camera's battery life and carry spares. Better yet, use an AC adapter or a USB power delivery battery grip if your camera supports it. Practice swapping batteries quickly — can you do it without moving the camera?
USB cable disconnects
Unplug the USB cable mid-script and see what happens. Does eclipseClick detect the disconnect? Can you reconnect and resume? Practice reconnecting under pressure. Use a USB cable with a locking connector or tape the connection down. Keep a spare USB cable in your kit. Test with your specific cable — cheap cables are the #1 cause of intermittent disconnects.
Laptop battery runs out
Your laptop needs to last the entire session (2-4 hours). Test your laptop's actual battery life while running eclipseClick with a camera connected, Live View active, and the screen on. Factor in heat — laptops throttle and drain faster in direct sunlight. Bring a portable power station or car inverter. Set your laptop power plan to "High Performance" and disable sleep/hibernation.
GPS loses fix
Cover your GPS antenna mid-session to simulate signal loss. Does eclipseClick fall back gracefully to the last known position and system clock? Understand the difference between GPS-corrected and uncorrected timing so you're not surprised if GPS drops out during the eclipse. The app will continue operating with the system clock — your script won't stop.
Memory card fills up
Calculate how much storage your full script needs. A typical eclipse capture generates 500-2,000 RAW files depending on your bracket settings. At 25-60 MB per RAW file, that's 12-120 GB. Start a practice run with a nearly-full card to see what happens when it fills. Use a fresh, fast card on eclipse day — minimum UHS-I speed class (U3) for burst shooting.
DSUSB shutter cable comes loose
If you're using a DSUSB adapter, disconnect the shutter cable during a capture. Does the script continue via SDK? If your script relies on DSUSB as the primary shutter method, know your fallback. Secure all cable connections with tape or strain relief clips.
Test in conditions similar to eclipse day
Field Checklist
Print this checklist and pack it with your equipment. Check every item before you leave for your observation site.
Camera & Optics
- Camera body (fully charged battery)
- Spare camera batteries (2+ recommended)
- Lens or telescope with solar filter
- Memory card (formatted, verified capacity)
- Spare memory card
- Sturdy tripod
Computer & Cables
- Laptop (fully charged, eclipseClick installed)
- Laptop charger or portable power station
- USB cable (tested, not just any cable)
- Spare USB cable
- DSUSB adapter + shutter cable (if using)
- GPS receiver (if using)
Software & Scripts
- eclipseClick script saved and tested
- Windows power plan set to "High Performance"
- Sleep and screen timeout disabled
- Windows Update paused (avoid mid-session restarts)
- Antivirus exclusion for eclipseClick (prevents lag from real-time scanning)
Field Comfort
- Eclipse glasses for visual observing
- Laptop shade or hood (screen visibility in sunlight)
- Tape (gaffer or painter's) for securing cables and focus ring
- Printed checklist (this one!)
Eclipse Day
Everything is set up. Here's your checklist for eclipse day.
Set up your equipment in the field
Mount your camera on a tripod, attach your solar filter, and connect all cables (USB to camera, DSUSB if using, GPS receiver).
Connect and verify in eclipseClick
Open eclipseClick and go to the Equipment tab. Make sure your camera, DSUSB, and GPS (if using) all show as Connected.
Load your saved script
Open the script you created with the Script Wizard. Review the timeline to make sure everything looks correct for your location and equipment.
Focus and lock
Use Live View to check focus on the sun (with your solar filter on). Once focused, switch your lens to manual focus to lock it in place.
Execute
Hit Execute and let eclipseClick run the entire capture sequence automatically. The execution monitor shows real-time status for every step.
Run a dry run first
Ready to get started?
Download eclipseClick for free and follow this guide to set up your first eclipse capture.